
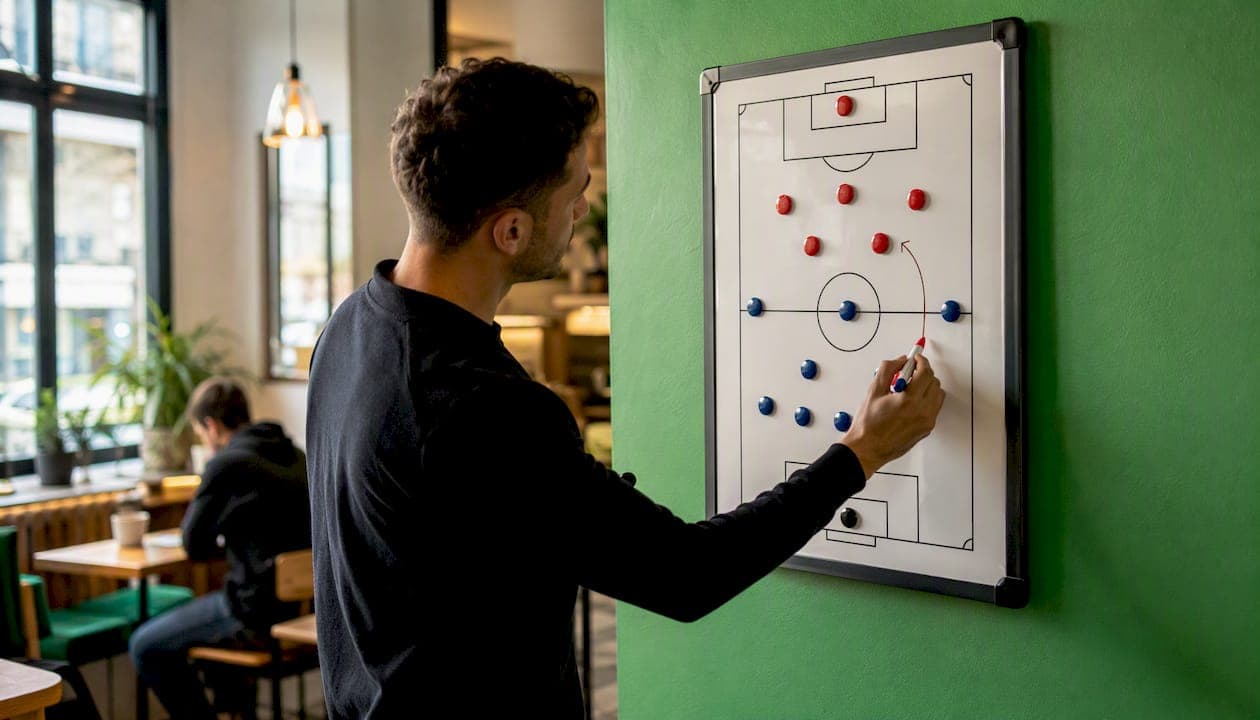
The 4-2-3-1 is a balanced, transition-resilient shape that gives coaches a stable defensive base through a double pivot while enabling four coordinated attackers to create overloads and quick counters. According to Coaches' Voice analysis, it remains widely favored at elite level precisely because it balances four defensive and attacking lines and morphs fluidly into a 4-4-2 or 4-4-1-1 out of possession.
By the end of this guide, you will be able to assign player profiles to every position, run three progressive training sessions, and make in-game adjustments against the most common opponent systems.
The 4-2-3-1 fits your team when:
- You want a stable defensive block with a clear pressing structure
- Your squad has a creative No.10 and wide forwards who can invert
- You need transition protection while still threatening on the counter
- You are coaching a group that can handle positional role-switching
Main trade-off: the double pivot provides excellent central security, but the lone striker can become isolated if the No.10 and wingers fail to connect quickly in the final third.
Key Takeaways
The 4-2-3-1 works when the double pivot is staggered, the No.10 stays between the lines, and pressing triggers are rehearsed until they are automatic.
| Point | Details |
|---|---|
| Stagger the double pivot | One pivot holds, one advances; running both forward simultaneously collapses central security. |
| No.10 decides the shape | A well-positioned No.10 connects midfield to attack; a poorly positioned one breaks the formation's structure. |
| Press as a coordinated unit | Striker's cover shadow run starts every press; individual pressing without triggers is ineffective. |
| One full-back advances at a time | Both full-backs pushing high simultaneously exposes the weak side to a switch of play. |
| Ballknw Gaffa for pre-field testing | Run pivot and pressing scenarios in Gaffa's free browser simulation before committing to a setup in training. |
Table of Contents
- How the four lines of the 4-2-3-1 connect
- What player profiles does each position actually need?
- In-possession patterns that make the 4-2-3-1 dangerous
- How the 4-2-3-1 defends: shapes, pressing triggers, and block adjustments
- Transitions: winning the ball back and attacking on the counter
- Tactical variations and how opponents try to break the shape
- Three session templates to teach the 4-2-3-1
- How to test 4-2-3-1 ideas in simulation before training
- Elite examples: Guardiola, Pochettino, Flick, and Southgate
- Most common mistakes coaches make with the 4-2-3-1
- The 4-2-3-1 takes longer than you think to implement
- Test your 4-2-3-1 setup in Gaffa before you take it to the pitch
- Sources
How the four lines of the 4-2-3-1 connect
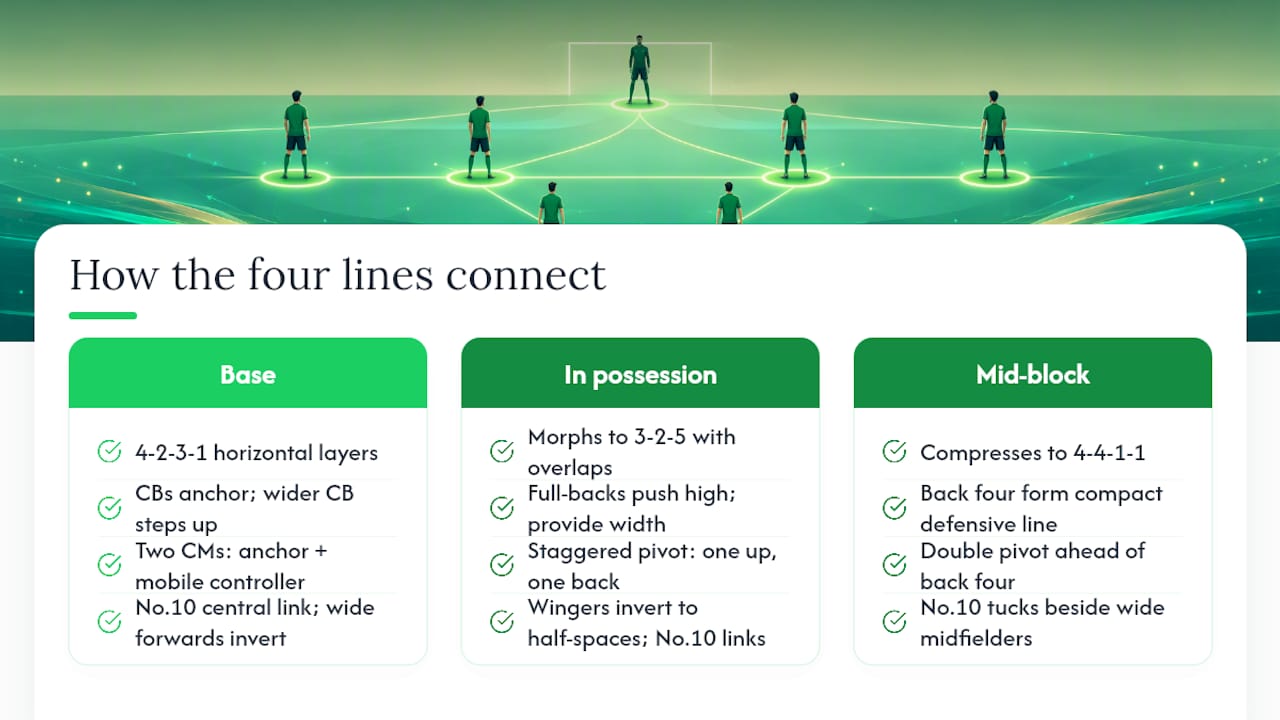
The formation organizes into four horizontal layers, each with a distinct job, and the shape only works when all four communicate.
Back four. The two center-backs anchor the defensive block, with the wider center-back often stepping into midfield during build-up to create a temporary back three. The full-backs provide width and, in possession, push high to stretch the opposition's defensive line.
Double pivot. Two central midfielders sit just ahead of the back four. One acts as a defensive anchor, screening the backline; the other operates as a mobile controller, receiving on the half-turn and driving play forward. Tactico's formation breakdown confirms that staggering these two roles (one up, one back) is foundational. Without it, the system loses stability.
Attacking three. The No.10 occupies the central channel just behind the striker, linking midfield to attack. Two wide forwards flank the 10, typically inverting off their stronger foot to cut into half-spaces. When wingers tuck in and full-backs overlap, the shape morphs into an attacking 3-2-5 structure, as Manchester City Analysis documents.
Lone striker. The center-forward pins the opposition's center-backs, holds the ball under pressure, and drops intelligently to create space for the No.10's runs. The striker's movement is the engine that opens the final third.
Diagram recommendation: request a three-panel visual: (1) the base 4-2-3-1 with positional zones labeled, (2) the in-possession rotation to a 3-2-5 showing full-back advance and winger inversion, and (3) the mid-block compressing to a 4-4-1-1 with the No.10 tucking alongside the wide midfielders.
Pro Tip: Think of the four lines as two pairs. The back four and double pivot form a defensive unit of six; the attacking three and striker form an attacking unit of four. Coaching the shape is easier when players understand which pair they belong to in each phase.
What player profiles does each position actually need?
Matching the right athlete to each role is where 4-2-3-1 tactics succeed or fail. Here is a position-by-position checklist.
Center-backs
- Comfortable in possession; can play out under pressure
- Strong in 1v1 defending when the press is beaten
- One CB should be comfortable stepping into midfield during build-up
Full-backs
- High work rate; able to cover ground from box to box
- Crossing ability or the capacity to combine in tight spaces
- Defensive discipline to recover when caught upfield
Pivot: anchor role
- Exceptional positional sense; rarely caught out of position
- Wins second balls and breaks up opposition sequences
- Distributes simply and quickly under pressure
Pivot: controller role
- Comfortable receiving on the half-turn in tight spaces
- Passes forward with purpose; can carry the ball 10–15 yards
- Reads when to step forward and when to hold the line
Pro Tip: Pairing two identical holding midfielders kills the system. The Athletic's tactical coverage consistently points to complementary pivot profiles (anchor + mobile controller) as the difference between a functional double pivot and a static one. One player screens; the other progresses.
No.10
- Creative, with the vision to play between lines
- Presses intelligently when the team is out of possession
- Comfortable as a second striker in transition
Wide forwards
- Inverted winger type: cuts inside onto stronger foot, shoots or plays the final pass
- High pressing intensity; willing to track back to support the full-back
- Can also play wide and cross if the system demands it
Lone striker
- Hold-up ability to bring others into play
- Timed drops to create space for the No.10
- Aerial presence is a bonus, not a requirement
Coaches' Voice notes that wingers cutting inside to free full-backs is what creates the attacking 3-2-5 structure. That only happens if the wingers have the technical quality and tactical discipline to invert at the right moment.
In-possession patterns that make the 4-2-3-1 dangerous
The shape's attacking threat comes from half-space occupation, full-back involvement, and the No.10's ability to connect lines. Three patterns do most of the work.
Build-up through the pivot. The center-backs split wide. The anchor pivot drops between them, creating a temporary back three. The controller pivot receives in the half-space, turns, and plays forward. This sequence gives the team a press-resistant circulation pattern before the ball reaches the attacking lines.

Far-side switch via the No.10. Once the ball reaches one side of the pitch, the No.10 drifts to the opposite half-space. A diagonal pass from the controller pivot finds the 10 in space, who then plays the overlapping full-back or the inverting winger. The switch bypasses the opposition's press in one move.
Striker drop + winger run. The lone striker drops short to receive, dragging a center-back with them. That movement opens a channel behind the defensive line. The near-side winger times a run into that channel. The striker lays off to the No.10, who plays the through ball. This sequence is repeatable and coachable because the trigger is the striker's drop, which every player on the team can read.
Coaching cue for build-up: tell your center-backs to "split and invite." When the goalkeeper has the ball, both CBs move wide to the edge of the penalty area. That movement pulls the opposition's press wide and creates the central lane for the pivot to receive.
How the 4-2-3-1 defends: shapes, pressing triggers, and block adjustments
The 4-2-3-1's defensive identity depends on which block the team uses and how the pressing triggers are communicated. Total Football Analysis shows that pressing variations commonly shift the shape into a 4-4-2 or 4-1-4-1, with the No.10 either man-marking the opposition's pivot or acting as a second striker to maintain pressure.
High press (4-4-2 shape out of possession)
- Striker leads the press with a curved run (cover shadow) to block the center-back's pass to the near pivot
- No.10 becomes a second striker, pressing the other center-back
- Near winger tucks in to cut the passing lane to the opposition's wide midfielder
- Far winger holds width to prevent a switch
- Double pivot holds a compact line just inside the opposition's half
Pressing triggers (communicate these explicitly in training):
- Goalkeeper plays long: striker and No.10 press the receiving center-back
- Center-back receives with back to goal: striker presses immediately
- Opposition pivot receives with head down: No.10 presses, near winger covers the second pivot
- Misplaced pass or heavy touch: nearest player presses, others shift to cover passing lanes
Mid-block (4-4-1-1 shape)
The No.10 drops to form a second line of four with the wingers and one pivot. The striker holds a high position to threaten on the counter. The block sits between the opposition's halfway line and their final third, inviting the ball wide before pressing.
Low block (4-4-2 flat)
Both wingers drop to form a flat four in midfield. The striker and No.10 form a compact front two, denying central passes. The double pivot holds in front of the back four, protecting the central lane.
When the press is beaten, the double pivot's job is to delay. One pivot steps to the ball carrier; the other drops to cover the space behind. This buys time for the back four and wingers to reset their shape.
Transitions: winning the ball back and attacking on the counter
Transitions are where the 4-2-3-1 either justifies its structure or exposes its weaknesses. The shape already has four players forward (striker, two wingers, No.10), so a quick turnover can become a dangerous counter before the opposition reorganizes.
Immediately after losing the ball:
- The nearest player presses the ball carrier within two seconds
- The anchor pivot drops to cover the central lane
- The controller pivot secures the second ball
- Full-backs hold their position; neither pushes forward until the ball is secure
Converting turnovers into counters. When the anchor pivot or a center-back wins the ball, the first pass goes to the controller pivot or directly to the No.10. Tactico's analysis confirms that on turnover, the first forward pass typically goes to the 10 or a winger sprinting into space. The striker's job in this moment is to stay high and pin the opposition's center-backs, not drop to receive.
Protecting against the counter. The most dangerous scenario is when both full-backs are high and both pivots have stepped forward. A switch of play exposes the weak side before the block can reset, as the Premier League's tactical breakdown highlights. The fix is a clear rule: one full-back can advance, never both simultaneously.
Pro Tip: Train the No.10 and striker to read each other in transition. If the striker stays high, the 10 carries the ball forward. If the striker drops, the 10 runs beyond. Two players making the same decision at the same time kills the counter.
Tactical variations and how opponents try to break the shape
Common 4-2-3-1 variations
False nine. The striker drops deep consistently, pulling both center-backs out of position. The No.10 and one winger make runs into the vacated space. Guardiola used this at Manchester City to create numerical overloads in the final third.
Inverted full-backs. Both full-backs tuck into central midfield positions in possession, creating a 3-4-3 or 2-4-4 shape. This overloads the center but requires the wingers to provide all the width.
Narrow 4-2-3-1. Wingers play closer to the No.10, creating a compact central unit of five. Width comes entirely from the full-backs. Useful against teams that defend with a narrow block.
How opponents attack the 4-2-3-1
The Athletic's tactical analysis identifies the double pivot overload and striker isolation as the two most exploited vulnerabilities. A three-man midfield (4-3-3 or 3-5-2) can outnumber the two pivots in central areas, forcing the No.10 to drop and leaving the striker alone.
| Opponent system | How it attacks the 4-2-3-1 | Adjustment |
|---|---|---|
| 4-3-3 | Three midfielders overload the double pivot; wide forwards pin full-backs | Stagger pivot deeper; No.10 drops to create a 4-3-3 mirror |
| 3-5-2 | Wing-backs stretch full-backs; two strikers isolate the pivots | Hold one full-back; anchor pivot drops between CBs to create back three |
| 4-4-2 | Two strikers press both pivots simultaneously; wide mids pin wingers | Use CB step-outs to create 3v2 in build-up; No.10 drops as third pivot option |
Adjustment checklist when the shape is being overloaded:
- Drop the controller pivot 5–10 yards to create a 4-3-3 defensive shape
- Hold one full-back in a deeper position to prevent the switch of play
- Ask the No.10 to track the opposition's box-to-box midfielder rather than the pivot
- Change the pressing trigger: delay the press until the opposition reaches their own half
Three session templates to teach the 4-2-3-1
These three sessions follow a progressive structure, from technical repetition to full-team application. Run them in order across three to four weeks.
Session 1: Pivot mechanics and triangles (weeks 1–4)
Equipment: 8 cones, 4 bibs, 2 balls per group, 30x20 yard grid
Warm-up: 10 minutes of rondos (5v2) with the rule that the two pivots must always be on opposite sides of the circle. This builds the staggering habit before any tactical context is introduced.
Main drill: pivot triangle possession
- Set up a 20x15 yard grid with three zones: left, center, right
- Two pivots and one center-back work against two opposition midfielders
- The anchor pivot must stay in the center zone; the controller can move freely
- Objective: 6 consecutive passes before switching the ball to the far zone
- Coaching point: the anchor never advances beyond the center zone; the controller always offers an angle on the half-turn
Progression: add a No.10 who can receive in the far zone. Now the sequence is CB → anchor pivot → controller pivot → No.10. Measure how many sequences reach the No.10 in five minutes.
Coaching points: stagger positions (never side by side), controller receives on the half-turn, anchor scans before receiving.
Session 2: Striker-10 connection and wide overloads (weeks 5–8)
Equipment: full half of a pitch, 6 cones, 4 bibs, 2 balls
Warm-up: 15 minutes of positional play (8v5) in a 40x30 yard area. The team of eight must include a striker, No.10, and two wingers in their natural positions.
Main drill: 4v4+2 in the final third
- Striker, No.10, and two wingers attack against four defenders plus a goalkeeper
- Two neutral players (full-backs) play on the touchlines and can only be used once per sequence
- Objective: create a shot within 8 seconds of receiving from the coach
- Coaching point: striker drops to feet, No.10 runs beyond; or striker holds the line, No.10 drops to link
Progression: add a defensive midfielder who can press the No.10. Now the striker must decide whether to drop and receive or hold the line based on where the defensive midfielder is positioned.
Coaching points: striker's drop creates the space; No.10 must read the drop before it happens; wingers time inversion to the moment the No.10 receives.
Session 3: Press, transition, and match-situation scrimmage (weeks 9–12)
Equipment: full pitch, 14 bibs, 4 balls, 2 goals
Warm-up: 10 minutes of pressing triggers practice. Coach calls "trigger" and the front four must press to a designated shape within 3 seconds.
Main drill: 11v11 with pressing rules
- Full 11v11 scrimmage with one rule: when the goalkeeper has the ball, the pressing team must form a 4-4-2 shape before the goalkeeper plays out
- If the press is beaten, the pressing team drops immediately into a 4-4-1-1 mid-block
- Objective: win the ball in the opposition's half at least three times per 15-minute period
Progression: add a transition rule. When the ball is won, the team has 6 seconds to play forward. If they fail, possession returns to the other team. This forces the No.10 and striker to stay connected in transition.
Coaching points: pressing triggers must be verbal (striker calls "press"), pivot stagger resets after every sequence, full-backs cannot both advance in the same phase.
Tactico's coaching progression guidance recommends weeks 1–4 on pivot staggering, weeks 8–12 on the dropping pivot back-three build-up, and weeks 12–16 on pressing triggers and cover shadow drills. These three sessions map directly onto that timeline.
How to test 4-2-3-1 ideas in simulation before training
Simulation tools let you test personnel decisions, pressing aggressiveness, and substitution timing without burning a training session on a hypothesis. Ballknw's Gaffa is a free, browser-based football management simulation that requires no account creation and saves progress directly in the browser, making it a practical sandbox for exactly this kind of tactical testing.
Step-by-step simulation workflow:
- Squad selection. Assign your real squad to the 4-2-3-1 positions in Gaffa. Use the player data to identify which athletes fit the anchor vs. controller pivot profiles.
- Role assignments. Set pressing aggressiveness to high and confirm the No.10 is assigned a pressing role rather than a holding role.
- Run scenario 1: simulate five matches against a 4-3-3 high press. Track how often the double pivot is overloaded and whether the No.10 drops to compensate.
- Run scenario 2: switch to a 3-5-2 opponent. Observe whether the full-backs are exposed by the wing-backs and whether the anchor pivot drops to create a back three.
- Translate results. If the simulation shows the striker is isolated in more than half the sequences, that is a signal to run Session 2 (striker-10 connection) before the next match.
Pro Tip: Use simulation to test substitution timing, not just starting lineups. Run the same match scenario with the controller pivot subbed at 60 minutes vs. 75 minutes. The difference in defensive stability in the final 15 minutes is often visible in the simulation before it becomes a real problem on the pitch.
For coaches who want to explore squad building and season simulation beyond a single tactical setup, Ballknw's Draft XI guide covers how to translate simulation results into practice decisions across a full season.
Elite examples: Guardiola, Pochettino, Flick, and Southgate
Pep Guardiola at Manchester City. Guardiola's 4-2-3-1 at City was defined by inverted full-backs and a false nine. The full-backs tucked into central midfield, creating a 3-4-3 in possession. The striker dropped deep, pulling center-backs out of position and opening channels for the No.10 and wingers. The lesson: the 4-2-3-1 is a starting point, not a fixed shape. Guardiola's version barely resembled the base formation in possession.
Mauricio Pochettino at Tottenham Hotspur. Pochettino used the shape to build a high-pressing identity at Spurs. The striker led the press with a cover shadow run, blocking the center-back's pass to the near pivot. The No.10 became a second striker in the press, and the wingers tucked in to cut central outlets. The lesson: pressing in the 4-2-3-1 is a coordinated sequence, not individual effort. Pochettino drilled the triggers relentlessly.
Hansi Flick at Bayern Munich. Flick's Bayern used the 4-2-3-1 as a counter-pressing machine. After losing the ball, the front four pressed immediately and aggressively, forcing turnovers in dangerous areas. The double pivot provided the security net when the press was beaten. The lesson: the formation's four advanced players are an asset in counter-pressing, not just in attack.
Gareth Southgate with England. Southgate used the shape defensively, prioritizing the 4-4-1-1 mid-block over a high press. The No.10 dropped to form a second line of four, protecting the central lanes. The striker held a high position to threaten on the counter. The lesson: the same formation can be coached as an attacking tool or a defensive one. The difference is where the No.10 is instructed to position in the defensive phase.
Most common mistakes coaches make with the 4-2-3-1
| Error | Why it breaks the shape | Coaching cue |
|---|---|---|
| Both pivots advance simultaneously | Central lane is exposed; a simple switch of play finds the striker or winger in space behind | "One up, one back — always. Call it out." |
| Both full-backs push high at the same time | Weak-side switch exposes the back two; no cover for the overlapping winger | "Near full-back goes; far full-back holds until the ball switches." |
| No.10 drops too deep in possession | Striker becomes isolated; the link between midfield and attack disappears | "10 stays between the lines — not in midfield, not in the box." |
| Striker presses straight at the center-back | No cover shadow; center-back plays easily to the pivot | "Curve your run. Block the pass to the pivot before you press the ball." |
| Wingers hold wide in the defensive phase | Creates a 4-2-2-2 shape with two gaps between the lines | "Wingers tuck in when we're out of possession. Width is for the full-backs." |

Corrective exercise for pivot discipline. Set up a 30x20 yard grid. Two pivots, two center-backs, and one opposition striker. Rule: if both pivots are in the same half of the grid simultaneously, the opposition scores a point. Run for 10 minutes. The spatial constraint forces the staggering habit faster than any verbal instruction.
Corrective exercise for full-back timing. In a 11v11 scrimmage, place a cone 10 yards behind each full-back's starting position. If a full-back advances past the cone while the other full-back is already forward, play stops and the team resets. Two or three stoppages per session is usually enough to fix the habit.
The 4-2-3-1 takes longer than you think to implement
The formation looks clean on a whiteboard. On the pitch, it takes most groups 10–12 weeks before the pressing triggers feel automatic and the pivot staggering holds under pressure. That gap between understanding and execution is where most coaches lose patience.
The early frustration is almost always the same: the No.10 either drops too deep and becomes a third pivot, or stays too high and loses connection with the midfield. Neither is a personnel problem. It is a spatial awareness problem that repetition fixes. Run the pivot triangle drill from Session 1 for the first 15 minutes of every training session for the first four weeks. The habit forms through volume, not explanation.
Player buy-in matters more than tactical sophistication. A group that understands why the striker curves their press run, why only one full-back advances at a time, and why the anchor pivot never steps forward will self-correct during matches. Spend time on the reasoning, not just the mechanics.
Test your 4-2-3-1 setup in Gaffa before you take it to the pitch

Gaffa on Ballknw gives you a free, no-login browser simulation where you can load a real club, set your 4-2-3-1 shape, assign pivot roles, and run matches against common opponent systems before you commit to the setup in training. No account, no download, no cost.
Here is a quick scenario to run: load a mid-table club, set the formation to 4-2-3-1, assign your best defensive midfielder as the anchor pivot, and simulate five matches against a 4-3-3 opponent with high pressing intensity. Watch whether the double pivot holds or whether the No.10 is forced to drop. That single observation will tell you whether your pivot pairing is right or whether you need to adjust before the next session.
Coaches who prefer desktop testing can check Ballknw's PC football manager guide for additional simulation options. Either way, testing the shape in simulation before the grass saves you at least one wasted training session per tactical change.
Sources
The sources below informed this guide and are worth bookmarking for ongoing 4-2-3-1 formation analysis.
- The 4-2-3-1: football tactics explained
- 4231 soccer formation — Manchester City Analysis
- The 4-2-3-1: football tactics explained — Premier League
- Pressing variations within a 4-2-3-1 — Total Football Analysis
- 4-2-3-1 Formation Explained — Tactico
- The Athletic / NYT tactical coverage (aggregated)